I would not have done this but I had to! I bought a TOZ that came with problems.
I inspected all of the parts in the accelerator/trigger group and they matched up to those in my functioning TOZ. I concluded that non of the parts are broken. The unit has been removed from the rest of the gun. The "middle lever" does not remain in place next to the "accelerator firing pin" or as I call it the hammer.
Can someone tell me the proper placement of the spring that is under the "limiter" on the "middle lever"? Is there a ledge that it sits on? Should it be placed on the middle lever when the hammer is under tension? Should the accelerator spring be in place while installing the limiter, spring, and bushing?
I know this is a deep subject. I have tried a few things and the middle lever is just flopping around.
Thanks to all who respond.
Susan
TOZ 35 Accelerator Assembly - Need Help!
Moderators: pilkguns, m1963, David Levene, Spencer, Richard H
Forum rules
If you wish to make a donation to this forum's operation , it would be greatly appreciated.
https://www.paypal.com/paypalme/targettalk?yours=true
If you wish to make a donation to this forum's operation , it would be greatly appreciated.
https://www.paypal.com/paypalme/targettalk?yours=true
Susan,
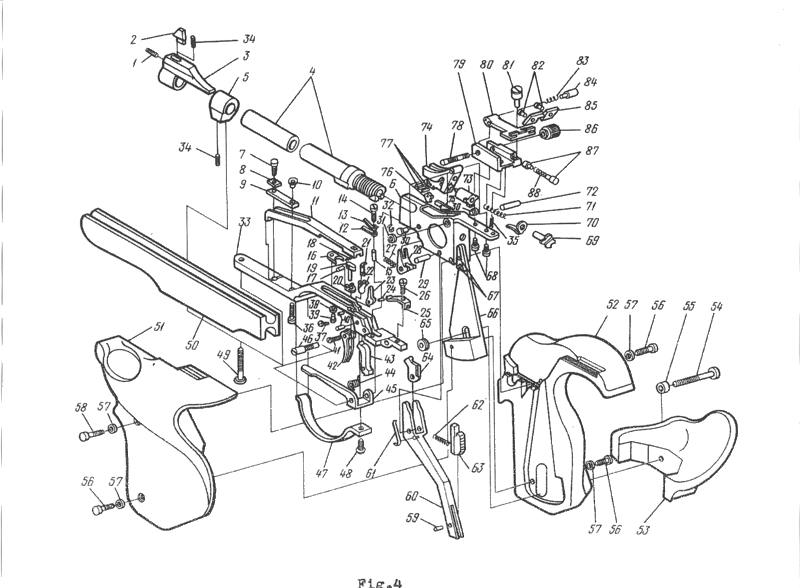
I do not have the TOZ exploded drawing and its parts list handy. So, please bear with me with my terminology of the trigger assembly's parts. The three parts in that assembly are intimately connected together.
Looking from the rear sight towards the muzzle, the "little finger" on your left is the one that stands straight up against the long leaf-spring that you would adjust triggering force with.
The other two, one you correctly named the "hammer" and the third one, the "hook"/(sear) that retains your "hammer".
The 2 small leaf-springs that you asked about, the upper one is the limiter (limiting how far back the "little finger" can come back), and the one below it supplies spring force to the "little finger".
The hammer is powered by the "accelerator" spring which is the last part that you would snug down when you work on the internals of the assembly; and the "hook" is controlled by the "little finger".
I suspect that the reason your "hook" is frailing around is because it is disconnected from the "little finger" (hopefully, see below, that neither part is broken beyond where you can easily see).
The bottom of the "little finger" has a tiny pin that cantilevers out to its right to engage the "inverted horse-shoe' bottom of the "hook".
If, at some time, the "limiter" was out of position, and the "little finger" was allowed to come back beyond where the "limiter" would have stopped it; then its cantilever pin would get out of the "inverted horse-shoe"....and the "hook" is now on its own.
You can easily reset the cantilever pin back into the "inverted horse-shoe" by placing the 2 little springs in their correct positions BUT with their hold-down screw very much loosened so it is practically applying little/no force on your "little finger". Move the "little finger" out ever so slightly and do the same with the "hook"; visualizing in your mind how both the cantilever pin and the "inverted horse-shoe" are moving in their respective arcs that intersect at some point.
You job is to gradually feel and find that point. You will know that you have found the point if by moving the "little finger", the "hook" moves ever so slightly; and vice versa.
Now keep your thumb on all 3 parts and tighten down the retaining screw for the two leaf-springs; making sure that the limiter is NOT rubbing against the "hammer" next to it. When you release your thumb, your "little finger" will spring back to be stopped by the "limiter".
Pushing your "little finger" forward will cause the "hook" to engage the "hammer" -- if you snug down the "accelerator" spring hold-down screw. And wah-la, you have a working trigger assembly again.
The above procedure is assuming that all parts are in good order. In the last year, I have seen one almost new TOZ with the "inverted horse-shoe" broken (due to originally uneven machining work so that the broken leg of the horse-shoe is much thinner than the other). I have also seen another quite new one where the "hook" would absolutely refuse to engage the "hammer" (no matter how much sear engagement had been allowed) until I, with the owner's permission, brutalized their common pivot with a few solid blows of a real make-shift hammer. I have not come across one with a broken cantilever pin; nor one with a sheared pivot for the the 3 parts; nor an enlarged hole(s) in their sheet metal "cage".
HTH and have fun getting acquainted with the trigger assembly.
Paul Ha.
Paul's Instructions Are Great!
After reading Paul's instructions and looking at my two trigger assemblies I did the following:
1. fixed trigger assembly one. I was able to slip the inverted horse shoe bottom portion of the hook over the pin part of the little finger. I tightened down the 2 leaf springs, installed the big lever and the accelerator spring and voila - my trigger assy works again.
2. trigger assy 2 has problems. The inverted horse shoe bottom portion of the small lever/hammer hook is broken. I will start to hunt one down tomorrow.
WOW do I feel accomplished.
Thanks Paul
Susan Paris
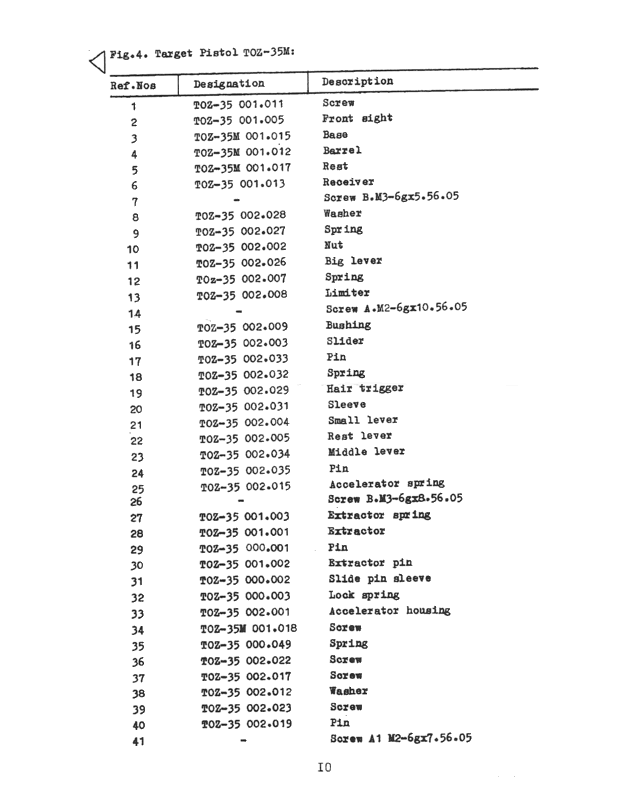
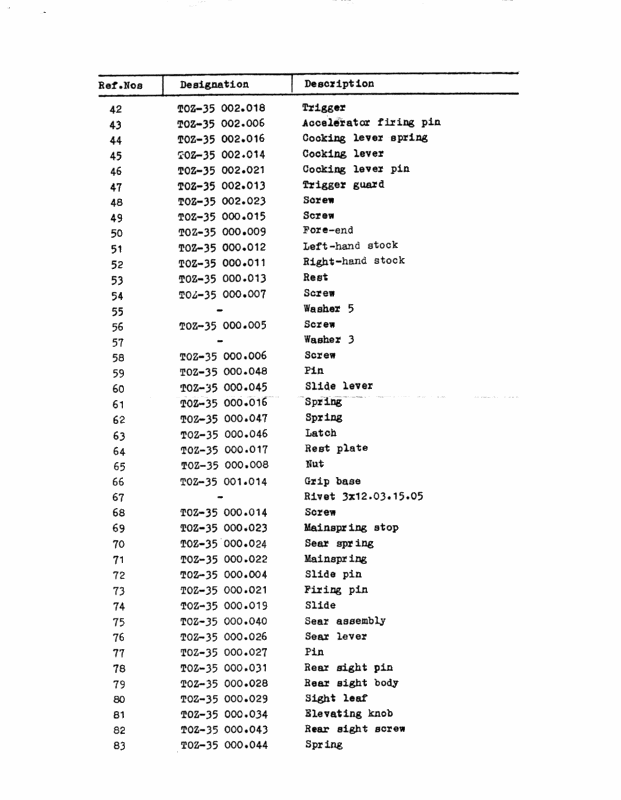
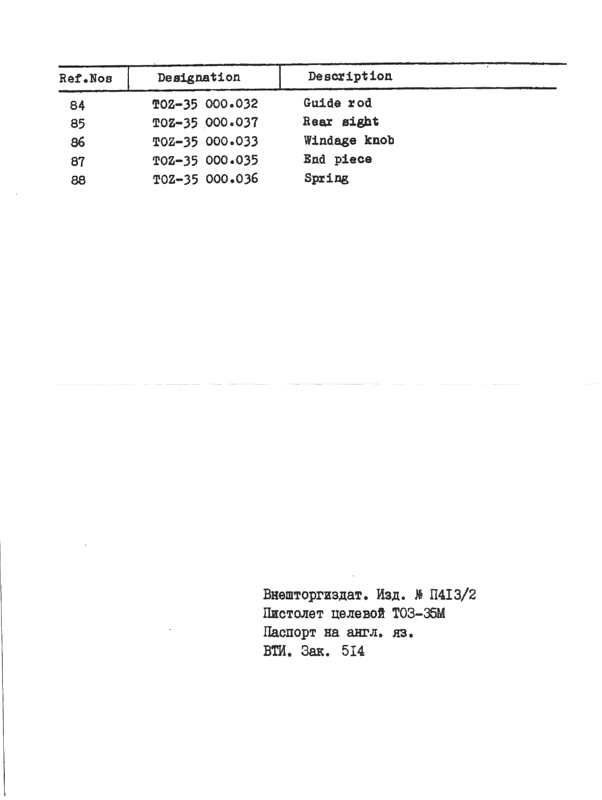
TOZ Exploded Drawing
Copy of TOZ 35 instructions - http://www.pilkguns.com/tenp/sptoz35.htmPaul Ha wrote:.... TOZ exploded drawing and its parts list .....